The short version
- Eight exterior angles from one walk around the car: the front, both front three-quarters, both sides, both rear three-quarters and the rear.
- The same distance and height for every exterior shot: the whole car in the frame, the phone level at about door-handle height, on its main lens.
- Lead with a front three-quarter. It is the angle Google recommends for the main image of a vehicle ad.
- Then the cabin and the details: dashboard, odometer, seats, cargo area, a tire with its tread, the keys and any damage.
- About 25 to 30 photos in all, with the strongest nine first.
01The exterior shot list
Walk around the car once and stop at eight places. Start square to the front bumper, go down the driver's side, around the back and up the passenger side, and finish at the front corner you have not shot yet. Stop the same distance from the car each time, so the eight photos look like one set.
- Front. Square to the grille and centered on it, with the whole width of the car in the frame and a strip of ground in front of the tires.
- Front three-quarter, driver's side. Halfway between the front and the side, at about 45 degrees, so the grille and the whole driver's side show in one photo. This is the usual lead photo.
- Driver's side. Square to the side, centered between the front and rear wheels, with room past both bumpers.
- Rear three-quarter, driver's side. About 45 degrees between the side and the rear, so the taillight and the length of the car show together.
- Rear. Square to the trunk lid or tailgate and centered on it.
- Rear three-quarter, passenger side. Shot 4, mirrored.
- Passenger side. Shot 3, from the other side.
- Front three-quarter, passenger side. The last stop before you are back at the front. With shots 2 and 8 you can lead with whichever side shows the car better.
Distance, height and light
- Use the main camera. On a phone that is the 1x lens, not the 0.5x ultra-wide, which bends a car and stretches whichever end is nearest.
- Stand back far enough for the whole car, with a margin on every side, and keep that distance for all eight shots. Google disapproves vehicle ad images that cut off part of the car (Merchant Center vehicle ads image guidelines).
- Hold the phone level, at about door-handle height, and turn it sideways for every exterior shot. Pointing it up or down changes the car's proportions from one photo to the next.
- Keep the wheels straight and the steering wheel centered for the whole walk. If the same photos become a 360° spin, nothing on the car should change between frames.
- Shoot in even light. Cox Automotive's photo advice for dealers is to avoid dark shade, shadows from trees or other objects, and direct sunlight that causes glare (Telling Your Value Story Through Photos, 2018).
- Give the car room. The same article says the car you are selling should be the only one in the photo. Move it out of the inventory line so nothing overlaps its outline in any shot.
02Interior and detail shots
Open the doors for the cabin and stand in the door opening with the phone at about seat height. Turn the ignition on so the screens and the instrument cluster are lit, and keep the keys out of the frame until their own shot.
Cabin
- Dashboard and steering wheel, from the open driver's door.
- Instrument cluster, with the odometer readable. Cox Automotive names the odometer reading as a detail worth capturing.
- Center screen and controls, with the screen on.
- Shifter and center console.
- Front seats, from the open passenger door or a rear door.
- Rear seats, and the third row if there is one.
- Cargo area, with the trunk or tailgate open and nothing in it.
- Headliner and sunroof, if it has one.
- Driver's door panel: the window, mirror and seat controls.
Details
- A wheel and tire, close, with the tread visible. Tire tread is the other detail Cox Automotive names.
- A headlight and a taillight.
- The badge or trim name, so a buyer can tell which version it is.
- The engine bay, hood up.
- The keys, all of them together.
- The window sticker, on a new car.
- Any damage, close up and in good light. A scratch the buyer has already seen in the listing is not a surprise on the lot.
03How many photos a listing needs
Two studies get quoted on this, and they point in different directions.
- More photos, more views. Cox Automotive reported that vehicle detail page (VDP) views per listing were 64.8% higher with 40 or more photos. The figure comes from Cox's own listing data for January 2018, in Telling Your Value Story Through Photos, published May 2, 2018.
- A strong first nine. A 2015 CarStory white paper on used-car shoppers concluded that nine photos was the optimal number and that too many can cause “image fatigue”, as Digital Dealer reported on March 27, 2015.
Both are years old and measured different things, so read them together rather than choosing one: post a complete set, and make the first nine tell the story on their own. Cox gives the same advice in the article above, which suggests showing a mix of interior and exterior angles within the first nine photos.
In practice that comes to about 25 to 30 photos: the eight exterior angles, nine in the cabin and a handful of details. Some sites cap the number. eBay takes up to 24 photos a listing, and CarGurus limits listings on its Restricted level to six; the limits for each site are in listing photo requirements by site. One Autorestage vehicle includes up to 30 photos restaged on a studio set (pricing).
04The order to upload them in
The first photo is the one shoppers see in search results, and the sites treat it as the main image: eBay calls it the main photo and shows it next to the title, and Autotrader's dealer upload makes the first photo the primary one. Google's vehicle ads guidelines recommend a front-to-side angle of about 45 degrees for the main image and advise against a rear angle there.
A first nine that follows that advice and Cox's:
- Front three-quarter, shot 2 or shot 8.
- The side on the same side of the car.
- The rear three-quarter on that side.
- The rear.
- The front.
- Dashboard and steering wheel.
- Front seats.
- Rear seats.
- Cargo area.
After those, the three exterior angles from the other side, the rest of the cabin, then the details, with any damage last but not left out. Each site's size, shape and overlay rules are in listing photo requirements by site.
05Lot prep checklist
Ten minutes here saves a reshoot. Before the first photo:
- Wash and dry the car, wheels and tires included. Water spots and brake dust show in close-ups.
- Clean the glass inside and out, and wipe any year or price markings off the windshield.
- Vacuum the cabin and the cargo area. Take out trash, personal items, loose papers and air fresheners.
- Park it on its own, on level ground if you can, with room to walk all the way around it.
- Set the car up the same for every shot: wheels straight, steering wheel centered, front seats upright and level with each other, headrests at the same height.
- Close everything for the exterior: doors, hood, trunk and windows, with the mirrors unfolded and the wipers down.
- Charge the phone and wipe the lens. A thumbprint on the lens softens every photo after it.
- Afterwards, put back anything you took off the windows for the photos.
06Printable shot list
Printing this page prints just this list, on one sheet: Ctrl+P on Windows, Cmd+P on a Mac, or Print in your phone's share menu. On a phone at the lot, you can also tick the boxes as you go.
Stock numberVIN, last 8Date
Exterior, one walk around
Cabin
Details
Before the first photo
07How the Autorestage console guides each angle
Autorestage turns the photos from this list into studio photos. The console runs in the browser, so the photos go up from the phone that took them or from a computer afterwards, one vehicle at a time.
Its upload card carries the same walk as the diagram above: a drawing of the car from above, with a numbered mark where to stand for each of seven angles (front, front three-quarter left, left side, rear three-quarter left, rear, rear three-quarter right and right side) and the path between them. On a computer, pointing at an angle's name lights up its mark.
It recommends at least seven photos, one from each angle, taken in a single walk around the car where it stands, and it takes JPEG, PNG or WebP files of up to 50 MB each. As the photos go in, a line under the preview says what is still missing: six exterior angles are enough for a 360° spin, and seven cover every recommended angle. Shot 8 from this list goes up with the others.
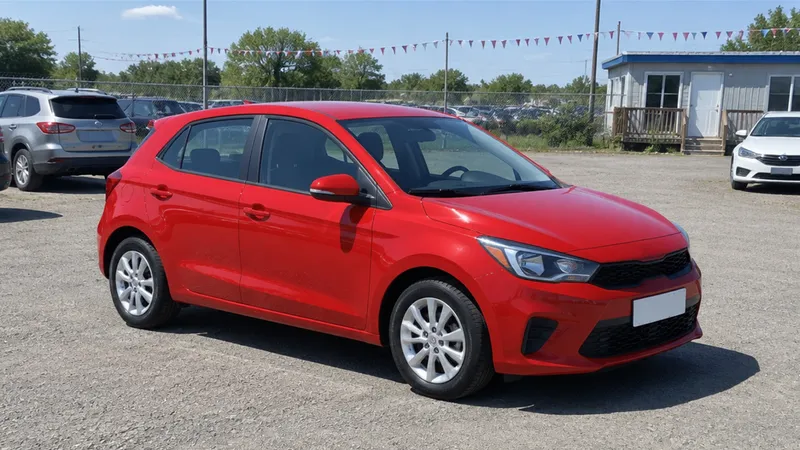
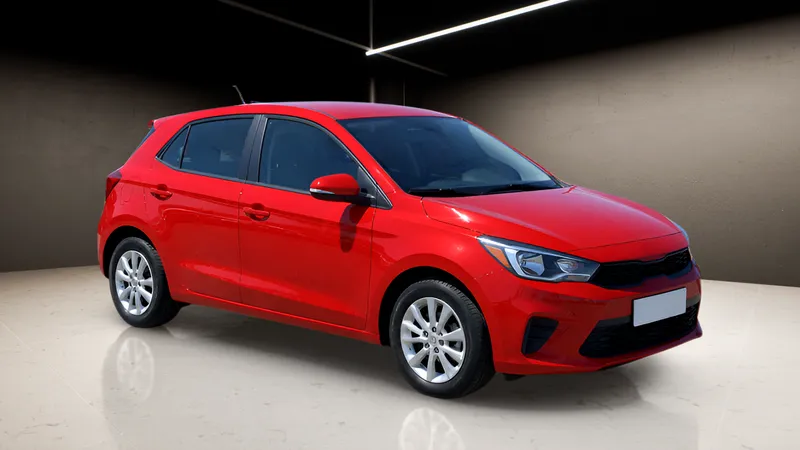
Then you pick one of 260+ studio sets and each photo is restaged on it: the fence, the other cars and the lot showing through the windows are replaced, and a photo shot at a slant is leveled. Use the same set for every car and the whole lot reads as one showroom. How background replacement works.
 As shot
 Autorestage
A front three-quarter, before and after the console. An AI-generated demo car; the camera photo is lined up with the render so the two can be compared, and nothing else in it is changed.
For a lot that shoots every car on a phone, see showroom photos for independent dealers.